Many of you asked how to set up a blog and learn to write your thoughts, experiences and ideas. I’ve even had some ask about turning their story into a book for the benefit of others. Obviously you have some expertise to share, a service to help, or a product worth talking about. Either way writing a blog and hosting a website will help you get the word out. Some blog writers have even jumped from online writing to publishing a book. Sometimes the posts themselves can be massaged and rewritten into a book. My aim is to tell how I began this journey and to show you how you can get started as well with just a few simple steps.
But before I share the tutorial, my story will give context and help answer some of your questions.
The Way I Started a Website
I first began writing spiritual thoughts for friends and fellow church members. I’d email these devotions once a week. I received encouraging stories about how my words, experiences, and thoughts helped others. So I kept writing. Eventually, from someone’s suggestion, I started a blog and my readers multiplied. (Side note: If my experiences helped others, then yours can too.)
The Part I Don’t Suggest You Follow
When I started, I didn’t know any better than to hire a web designer. Thankfully, I enlisted one at a fraction of the cost of most web designers. But just figuring out the design became a chore. Eventually I learned a simpler, easier—and cheaper—way to set up a website and begin writing for my readers.
Following my step-by-step instructions will save you an arm and a leg in designer fees and you’ll find them simple and easy even for a non-techy person like me. Unlike the hours and days of talking to the designer to settle on the design and months to get the site up and running, my total set up time to get you up and writing will take only a few minutes. You could do this during lunchtime. Just think about it. You can be reaching your audience in under an hour.
This information outlines setting up a self-hosted WordPress website. Self-hosted is the best option to keep your blog safely yours. At a fraction of the designer costs, you can have your own blog for less than one drink a week. It’s actually less than $7 a month for 12 months. (Keep reading and I’ll show you how to save even more money!)
Yes, there are free options such as Blogger and WordPress.com, but these free hosts can take down their hosting and urls for any reason and your blog will be gone forever. And yes, they allow free rent but they can close shop leaving you with nothing.
If you pay the price of one lunch a month, you own it and have paid the rent to park it in the cloud (on host servers). That’s called self-hosted. And if you put a little money into your endeavor, you’ll tend to be more committed to it. So let’s take on your fear of setting up a website. Bring your lunch.
Fast, Easy Steps to Setting Up Your Self-hosted WordPress Website
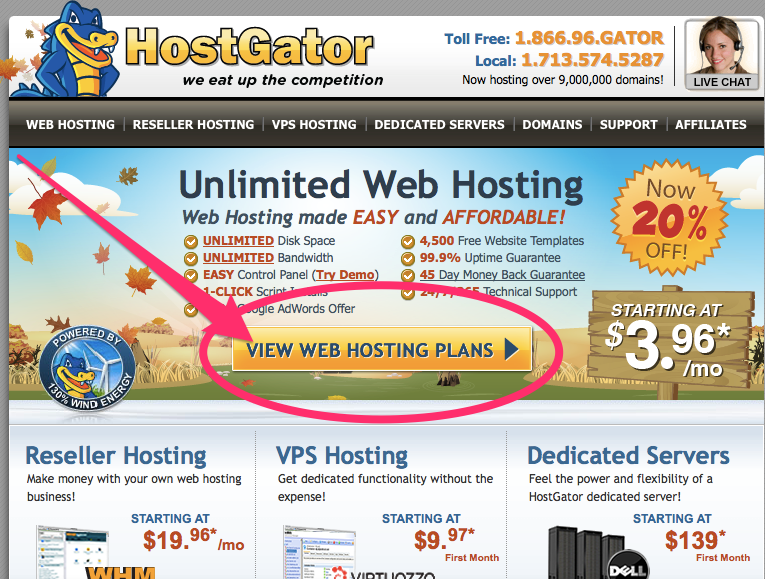
- Go to HostGator and click on the “View Web Hosting Plans” button.
I have used HostGator for years. They are very responsive and understanding of numbskulls like me learning to operate a self-hosted website. Their customer service is friendly and helpful. And they are priced comparable or even cheaper than others.
Note: I am a HostGator affiliate, which means the company pays me a commission when someone signs up using one of these links. But rest assured. I only became an affiliate because they have served me well and I honestly believe HostGator offers the best hosting available.
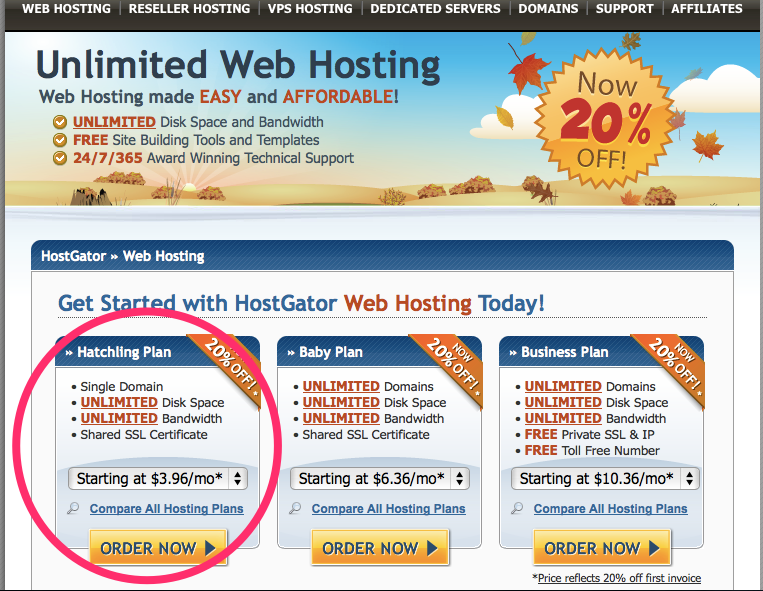
- A screen will pop up with various web hosting plans. Click the beginner version they call the Hatchling Plan.
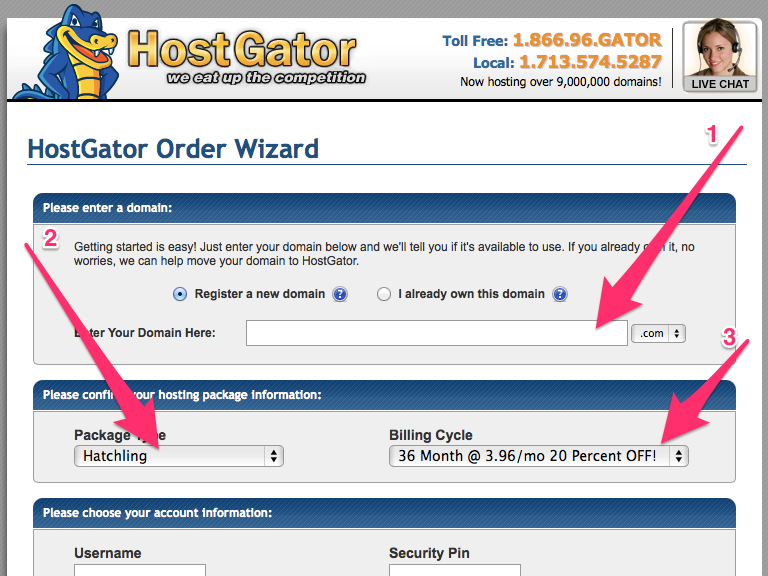
- The next screen will have a place to see if your desired domain name is available. Don’t feel bad if your first choice is already taken. Think creatively then simply make a decision about what your domain name will be. Don’t make the mistake of laboring long over it. Just pick one that you can work with. That being said, here are some tips to creating a good domain name:
- Make it easy to say and spell.
- Have it reflect your business name.
- Stay away from weird punctuation like hyphens, dashes, and numerals.
- And domains that end in .com are the most common.
- Confirm that Hatchling is your hosting package and you have an option to save more money if you sign up for more than a year in the drop down box.
Please note that my estimate above was based upon 12 months hosting. So, 3 years would bring the cost down to just over $4 a month. That’s cheap! But you will have to pay the money upfront.
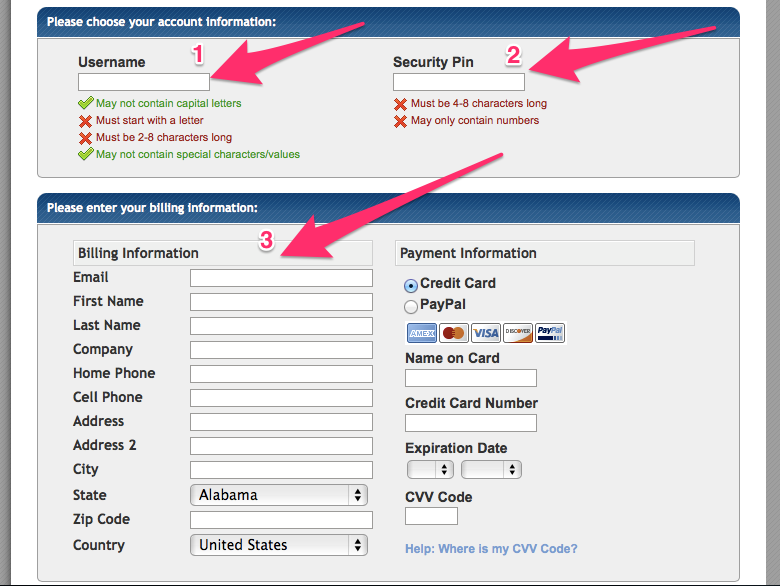
- Create a user name and a security pin. This will be how you login to your c-Panel, which you’ll learn about later.
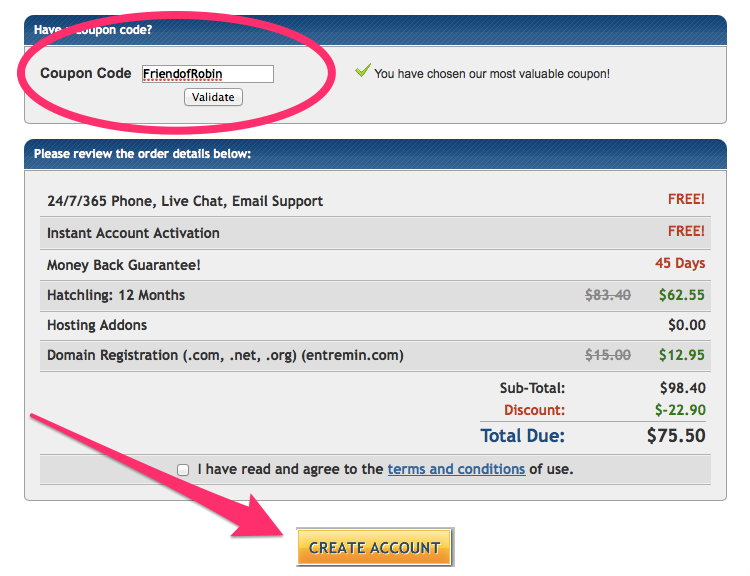
- Fill out your payment information. Don’t worry. HostGator has an unconditional 45-day money-back guarantee. So there’s no risk in trying it out.
- The next section has add-ons, but I only use one of them. I pay a little extra to guard my private information as it relates to the domain name with a WhoIs guard. HostGator offers that privacy option.
- For an extra $10 off the already 20% discounted price, enter my coupon code FriendofRobin.
- Agree and click Create Account. Now you have a self-hosted site!
Install WordPress on Your Self-Hosted Site
Let’s install WordPress on your site. HostGator has a short, easy to follow video demonstration which shows how to set up WordPress and help you publish your first post. Click the video image below and see just how easy HostGator is to work with.
Outline of the Video Steps
- Log into your C-Panel by typing in [your domain name including the .com]/c-panel. Obviously don’t include the brackets. The screen that comes up will be where you enter your user name and password.
- Once logged in, scroll to the Software/Services section and click on the QuickInstall logo.
- Find the Blog Software section and click the WordPress link.
- On the next screen, click “Continue.” The guy on the video demonstrates putting “myblog” into the box. I suggest you leave it blank so your domain name will be the location of WordPress as your main site.
Give your site a name. Anything you want. Then type in your email address where you can get your login information emailed to you. Follow that up by entering your first name and last name in their respective boxes. Then click “Install Now.”
- Voilà! After it’s installed click the “here” link on your screen and it will show you your new blog! Bookmark this page so you can come back to it. It is your site’s front end.
- Grab the password (copy it) from the email QuickInstall sent you, and we’ll log into the backend of your site. In the url of your front end, add /wp-admin. It will look like [your domain name including the .com]/wp-admin. That link brings up the sign-in form for your backend. Type in your user name and password and you’re in. Bookmark this page as well. You’ll spend time here.
- The video guy tells you how to change your password under Users on the left hand side if you desire. And then shows you how to use your backend Dashboard’s QuickPress to publish your first post. Go ahead and give it a whirl.
Special Plugin Suggestions and Tips for Customizing
My advice is to install a few plugins for spam, backups, and such. On the left hand side you’ll find Plugins > Add New. A screen will pop up for you to search plugins. Find and install:
- Askimet to protect your site from comment and trackback spam. Follow the instructions to set up the plugin.
- Contact Form 7 so people can contact you without posting your email. Email spam protection.
- WordPress Database Backup to back up your website so you won’t lose everything on your site. I have the settings set to email me a backup each night.
- Google Analytics to see stats on your blog. You won’t have many at first. But eventually you will.
WordPress offers many free themes to satisfy your preferences. On the left hand side, go to Appearance > Themes and try a few out. You could install tons of other themes here as well. But only purchase one from a reliable source. You can customize the theme under Appearance as well. Play with it a little.
Again on the left side is Posts > Add New. Now that you’ve set-up your own self-hosted WordPress website publish away.
For further training and information about your blog and making it look and operate awesome, try WP101.com. A great site with lots of videos.
If this tutorial benefited you in some way AND you can see how it will help others, please share it.
Tweetable: The fastest, easiest self-hosted website set-up for less than 4 bucks!
HaPpY PuBLiSHiNG!
Question: What experience or knowledge do you share that benefits others? What stops you from helping out? You can leave a comment by clicking here.
Please note: I reserve the right to delete comments that are offensive or off-topic.